Using Image Columns
Data Sources allow you to specify columns as containing a specific type of data, and Image is one of these types. This enables you to display images on the app in situations where rows of your Data Source are in use. Examples would include a thumbnail on each row when displayed as a list of options in a Form, or as a larger image when viewing the details of a single Row via a Details screen.
PLEASE NOTE: Currently only PNG and JPG image file types are supported by our platform and apps.
Setting up an image column
Let's explore how to set up a Data Source to have an Image column. To get started, you need to have an existing Data Source; if you don't have one, then create one now (see our associated guides for this process). Once you have your Data Source, follow these steps:
- Go to the Rows page of your Data Source (via Connected Data -> Data Sources.
- At the top of the rows is the horizontal list of column names. Underneath is a small drop-down that lets you select the data type for the column. On your target column, change the data type to Image.
- The page will refresh, and you will notice that now the rows are taller. This is because the image column is now making space for thumbnails of your images.
Save your changes at this point: you now have an Image column ready to go on your Data Source.
Adding images into your image column
There are two ways you can add image content into your shiny new Image column:
- If your Rows are editable (i.e., your Data Source has fewer than 100 rows and it's not connected to an external source), then simply click on each Image cell in the Rows page. This will pop up a file-choosing dialog window where you can choose a file to upload into that Image cell. The file will be stored on our platform upon successful upload, but be sure to save your changes after adding your images.
- By using web address hyperlinks to the images in question. (ex. https://upload.wikimedia.org/wikipedia/commons/e/e9/Goldfish3.jpg) The only restriction is that the hyperlinks must be publicly accessible from the internet - i.e., must not be hosted on a private network or require a session/login in order to access the image. An easy way to check if your hyperlink is truly public is to open a web browser window in Private browsing mode and then browse to the image hyperlink.

When you specify image hyperlinks, the image file is not downloaded to our platform. Instead, the file will be loaded from the given hyperlink on demand. Cache it locally on the device for offline use. You can specify hyperlinks as your Image column values when using any of the following import options:
- Manual Excel file import
- Connector to a spreadsheet or other data file
- Via our Data Source API
Image columns are a great way to add an extra dimension to your app, and the ability to simply specify a web address hyperlink to your chosen image makes for a dynamic and easy way to plug images straight into Data Sources.
Displaying images from a data source within a form
If images fail to load and display within the app, this can be resolved by taking the following steps:
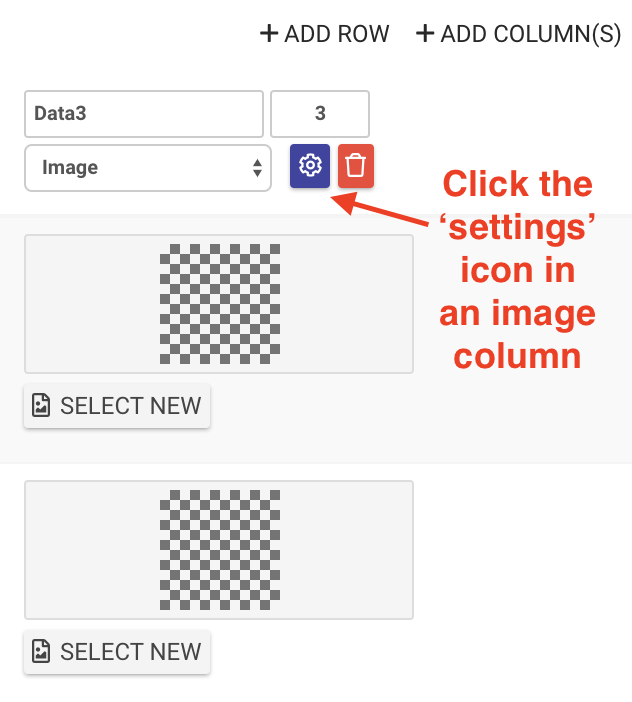
- Go to the Rows page of the Data Source containing the image
- Click the Cog icon in the header row of the image column
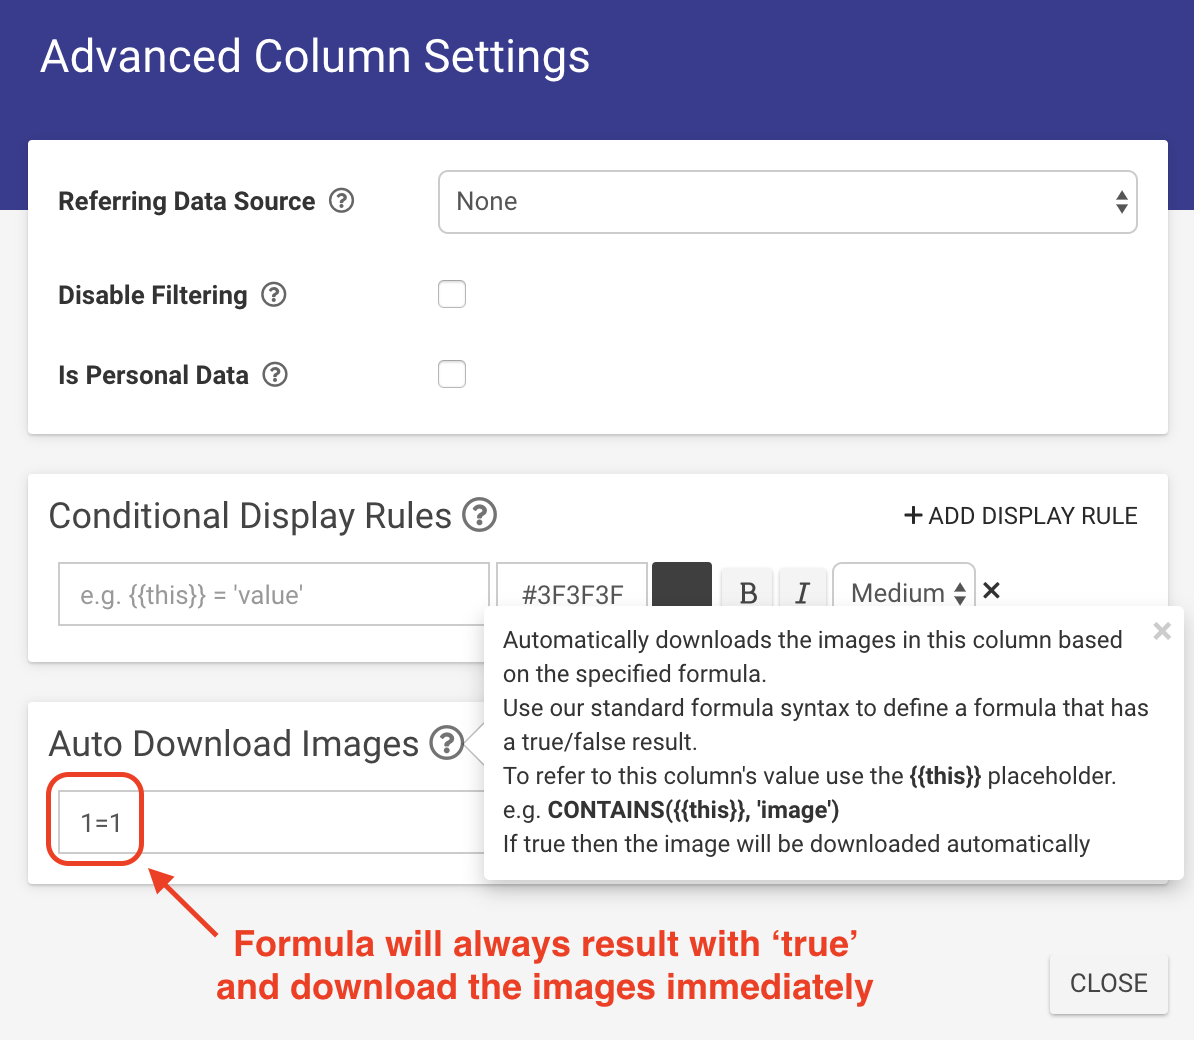
- Within the Advanced Column Settings dialog box that pops up, type "1=1" in the Auto Download Images field
Doing this will force the form to always, immediately download the image.
Related Articles
Data Source Image Columns
Data Sources allow you to specify columns containing a specific type of data, and Image is one of these types. This enables you to display images in the app in situations where rows of your Data Source are in use, for example as a thumbnail on each ...Xero Item Endpoints – Using Google App Script
This article provides detailed instructions on using Google Apps Script to retrieve line-item product and service information from your Xero account. Google Apps Script is a cloud-based JavaScript platform powered by Google that lets you integrate ...Data Source GPS Columns
To view a data source on a map, the data source must have at least one column with a type of “Geo Coordinate”. When the data source is saved, a new menu option will appear at the top of the page, as well as in the menu options when moving the cursor ...Using Formulas in Templates
The platform has the ability to evaluate formulae just like those you would use in your Forms. You can read all about what a formula is and how to create them in the Form Screens documentation. Being able to use a formula on your data output unlocks ...Referencing Data Source Columns in Forms
The Form Designer allows you to link Choices fields to a Data Source that you have previously uploaded. Data Sources can have as many columns as you like, and you may want to refer to the values in these columns when creating a Form. To do so, you ...