This Connector will be interesting if you have access to technical personnel (software developers) and want to tightly integrate with our platform.
The REST Connector will automatically send form entry data in XML or JSON format to your specific web service address.
This allows you to integrate with us on an event level – i.e., whenever we receive a new Form entry, you will receive the data on the nominal REST verb – e.g., POST.
Your web service should implement the API we specify to understand the data we send by default.
Technical staff should see our Form Entries API documentation (found in the Integration section of our help site).
Alternatively, you can define your custom request body to match existing API endpoints to which you wish to send form entry data.
Adding the Connector
Follow these steps to add the connector to your specific form:
- Navigate to App Workshop > Forms.
- Hover over your desired form and click the Connect icon.
- Click the Add Connector button (top-right).
- Select REST from the options.
Note: The page will refresh with the connector added. Changes are not live until you click Save.
Quick Access Tip
If you are already inside the Form Builder or Settings view, you don’t need to go back to the main menu. Simply click the Connectors tab located directly under the form title at the top of the screen.
Configuring the Connector
This section outlines the essential steps to configure your REST connector, including setting the HTTP action, destination URL, and other key configurations.
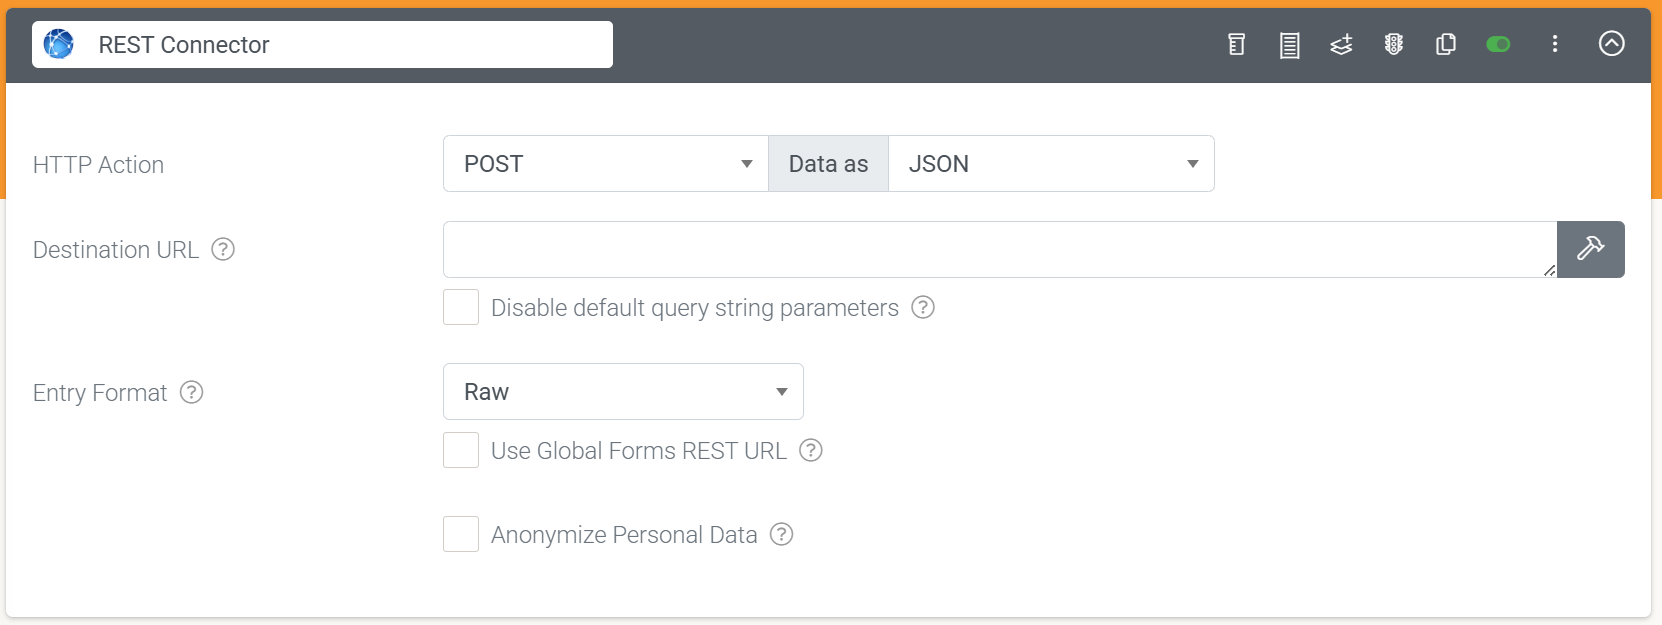
HTTP Action
Specify the API verb you wish to use to interface with the API. We support POST, GET, PUT, DELETE, and PATCH. You can also choose the text format for your API request.
We support the following formats for API integration:
XML, JSON, CSV, HTML, URL Encoded, Excel, Word, or Text.
Destination URL
You need to specify the destination URL to which our platform will POST data.
You can either enter a full URL manually or use the {{GLOBAL}} placeholder to substitute part of the address with your organization’s Global Forms REST URL, if configured in your organization settings.
Example: {{GLOBAL}}/api/endpoint
Disable default query string parameters (checkbox)
By default, certain query string parameters are appended to the URL. These parameters can be used to authenticate the origin of a request – e.g., your Organization’s Private Token value.
Enable this checkbox if you do not require this information to be sent.
Anonymize Personal Data (checkbox)
If enabled, data from fields marked as Personal Data will be converted to a non-human-readable format to aid privacy.
Additional Settings
This section explains advanced options that can be configured through the icons in the top-right corner of the REST connector configuration. These settings allow you to customize the connector’s behavior and define execution conditions.
Headers
Provide custom request headers to be sent as part of this REST request.
The following placeholders can be used to inject the user’s login details:
{{USEREMAIL}}
{{USERPASSWORD}}
{{ORGID}}
Body
Enter a custom payload in JSON or XML (depending on the content type selected).
You can use our data templating syntax to inject Form field placeholders and define repeating sections.
Backslashes (\) and double quotes (“) found within Form answers will be automatically escaped for JSON payloads.
This can be a problem if you want to inject a JSON array with the value of a single Form field answer.
To prevent double quotes from escaping within a Form answer, use a Dynamic Value formula such as SUBSTITUTE() in your Form design to precede the double quote occurrences with a backslash.
e.g., change your Form answer from “orange”, “apple” to be \”orange\”, \”apple\”.
Replace Placeholders with Display Text (checkbox)
By default, placeholders will be replaced with the raw answer value from the form entry. For example, date values are stored as UTC in ISO 8601 raw format, e.g., 2015-10-23T15:05:07Z.
Select this option if you wish to replace it with user-displayed text instead, e.g., 23-Oct-2015 05:05:07, assuming your time zone is UTC-10
Only Perform This Action When
Add a formula that determines whether this Connector should run when a form entry is submitted. Use the hammer icon to launch the Formula Builder and build a formula with a true/false result.
Run After Connector
Creates a dependency for this connector’s execution based on the outcome of the selected connector. For example, if you choose Success (property option), this connector will only run if the selected connector’s outcome is successful.
Global Service Endpoints
The Global Configuration section on the Organization Setup page (Menu > Organization Setup > Integrations) lets you define centralized settings that can be reused across multiple connectors and components in the platform. This simplifies maintenance and ensures consistency across integrations.
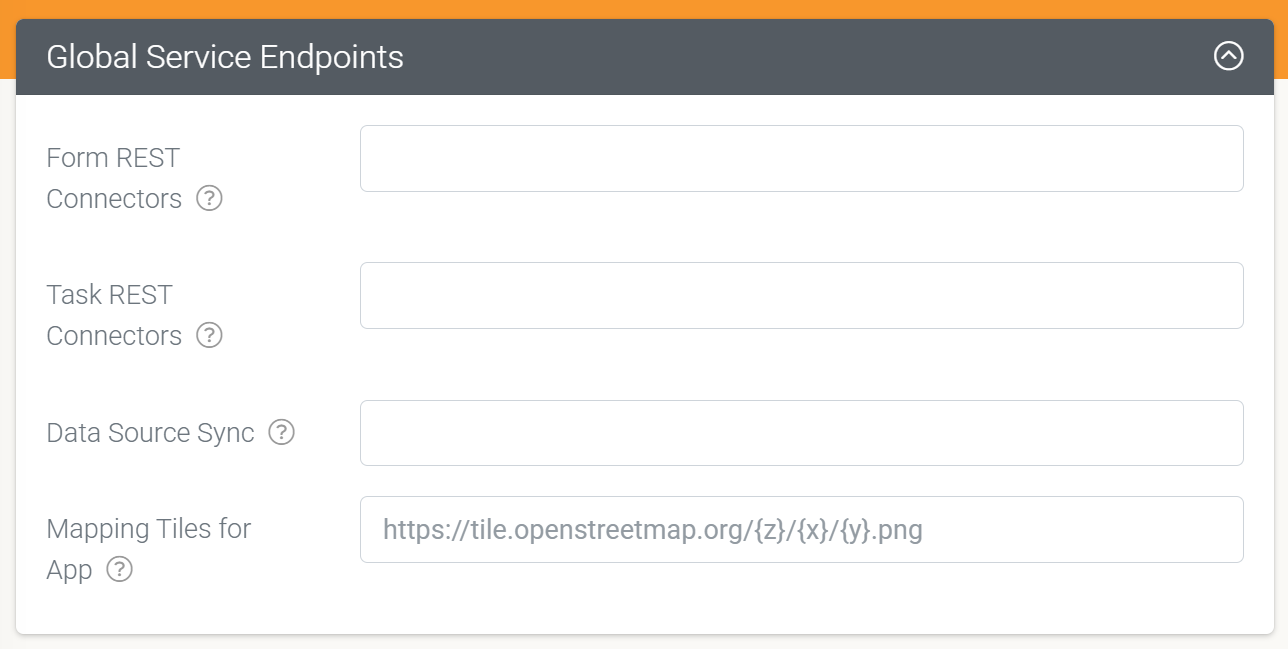
You can define global endpoints for the following connector type:
Form REST Connectors
Specify a global REST endpoint that will be used by all Form REST connectors referencing the {{GLOBAL}} placeholder.
This approach is particularly useful for maintaining a consistent API base URL across forms and for simplifying updates when endpoint changes.
Task REST Connectors
Specify a global REST endpoint that will be used by all Task REST connectors referencing the {{GLOBAL}} placeholder.
Data Source Sync
Specify a web service endpoint that can be used globally by Platform Sync and connectors in Data Sources.
Mapping Tiles for App
System-provided map tiles are used by default in the app to display maps to users.
If you want to use your own custom map tiles (e.g., from a GIS system), then specify a URL template here.
The URL must contain (z), (x), and (y) placeholders, representing the zoom level, X, and Y decimal coordinates to be passed to your tile source provider.
Examples:
- https://tile.openstreetmap.org/{z}/{x}/{y}.png
- https://[host]/arcgis/rest/serv/map/tile/{z}/{x}/{y}.png

Adding Custom HTTP Headers

Use the “Headers” option to add HTTP request headers to the platform’s REST request.
This is useful for external API services that require you to authenticate using Auth headers that contain your username and password.
Header values can also be dynamic – you can inject form field values using the usual {{myfieldname}} syntax.
Below are some HTTP Headers you might use when connecting to your desired API endpoints.
Customizing the Request Body

The “Body” option allows you to set up your own custom JSON or XML data payloads and inject form answer values using our standard {{fieldname}} syntax.
You can even cater to repeating data in your body using our {{!REPEATSTART}} {{!REPEATEND}} syntax that is normally reserved for data templates.
For example, you might have a JSON body that repeats timesheet rows like so:
Setting up a Dynamic Request URL
You can also inject answer values to dynamically build up the URL to which the request will be sent.
So, for example, your target URL could look like:
Click on the hammer next to the Destination URL box to open the Text Builder window to construct your dynamic destination URL.
Adding a Run Condition

Sometimes, you may have a Connector you only want to run/fire/trigger if the Form entry has a given answer value.
For example, you may have an Audit Form with a risk rating question offering options such as “Low”, “Medium”, and “High”.
If the user selects “High” for the risk rating, you want an email sent to a supervisor for follow-up and action.
This is where a Run Condition comes in.
Run Conditions are defined by creating a true/false formula.
The Connector will only run if the formula you define in the Run Condition has a true result.
So, in the example above, the Run Condition formula would be something like this: {{riskRating}} = ‘High’
The Run Condition field has a hammer icon next to it. This means that when you click on the hammer, you can construct a dynamic formula in the Formula Builder pop-up window.
See the Creating a Formula page to learn more about form formulas.
Adding a REST Step

Sometimes, you may have a Connector that requires data from an external web service for the request. This is where our “Add REST Step” option may be helpful.
The added REST step triggers first, allowing for retrieved data to be used in the request.
The result from the REST step is returned as $response for use in the subsequent request.
Access properties or lists of elements from JSON responses via the JSONVAL() and JSONLIST() formula functions.
Similarly, for XML responses, use XMLVAL() and XMLLIST().
e.g. {(JSONVAL($response, ‘path.to.property’))}
Troubleshooting
Timeouts on your REST connector jobs
You may encounter situations where your REST connector reports timeout errors when running on a Form entry.
This will occur because your REST web service is not returning a 200 OK status within 10 seconds of our platform sending the REST request.
The 10-second timeout applies to the time to execute the REST request, deliver the data, and get a response.
Any PDF file sent as part of the request will be generated before the request timeout clock starts.
Thus, the only images sent with a REST connector request would be those within a generated PDF file.
Our data center has gigabit connections and transmits quite fast. Your servers should have similarly fast transport links.
Increasing the timeout value could cause significant backlogs on our connector job queues when the target REST web services experience issues and fail to respond. In that scenario, our connector process will sit, waiting for a response for the entire timeout period. That would be 20, 30, 40, etc., seconds that a connector process is doing nothing when it could be processing the next job.
When this happens at scale (i.e., with thousands of connector jobs), it can create significant backlogs on our connector infrastructure.
At this point, we have no plans to increase the timeout beyond 10 seconds.
If you regularly hit the timeout limit, we recommend that you review your web service and make changes to process incoming requests more quickly.
A simple way to do this is to store the incoming request on a queue/database and respond with a 200 OK immediately.
Then, do any time-consuming processing (e.g., database inserts) asynchronously by having a separate process pick up the incoming from the queue/database.